
How to inexpensively make and install heated side mirrors with your own hands
The problem of frozen mirrors is well known to drivers who use their cars all year round. In premium cars (and not only) heated mirrors are already included in the basic configuration. However, such an option can be installed on any budget car. There are two ways: use the factory kit or do everything yourself. It is worth noting that in the latter case, the costs will be minimal. Everything you need is purchased at a hardware or auto store.
Once upon a time, such “convenience” was mounted using an ordinary car lamp with an incandescent filament. Of course, the method is outdated, but this does not mean that it cannot be used today. A distinctive feature of the “technology” is the minimal cost associated with the purchase of a 10 W light bulb. Well, you can also add sealant and glue for plastic here if you don’t have them. To equip the heating, you will have to remove and disassemble the mirror (separate the body from the reflective glass). There are many points here. If it is glued, you will have to use a building hair dryer. Otherwise, just unscrew the fastener. The order of further actions:
The next important point is the connection. The simplest option is to use a ready-made contact for heating the rear window. However, if you are going to "improve" both mirrors, it makes sense to make a separate power button. Do not forget that the lamps consume electricity and it is not recommended to leave them on for a long time.
The conductor can be pulled out of an old electric kettle or other household appliance. And nichrome thread is inexpensive in the store. You will need about a meter. More precisely, the resistance of the wire should be 12 ohms. Therefore, first cut off a 1 m piece and test it with a multimeter. If the resistance is higher, cut it off a little (1 cm). Repeat the procedure until you reach 12 ohms. First, you need to disassemble the case and pull out the reflector. Next, use a soldering iron to make tracks in the plastic, into which you first lay the foil, then the wire. Solder the cables to its ends and bring them out into the cabin.
You need to connect the “system” in the same way as described above, but it is highly not recommended to do it directly (or to the heated rear window), because the energy consumption is quite high. It is safer to use a separate fuse and relay. The latter should be four-pin. Connection:
A more modern and efficient way, requiring less effort and a little more money. Ready-made boards can be purchased online or at an auto shop. Structurally, the products are a pair of plates of electrically insulating material, between which there is a conductor in the form of, for example, a nichrome thread. How to install:
In terms of popularity, they confidently hold the first place. Installation is similar to installing boards, only nothing needs to be attached to the case. The films are glued to the back of the mirror with double tape (sometimes they already have a sticky layer on them) and connected to a power source or rear window heating.
This product is from a well-known Russian manufacturer producing glass for domestic cars. The heater is inexpensive, has terminals for connecting a cable, and is installed as described above.
Film from the Russian brand BOR with a size of 145x87 mm. Average price: 183 rubles. Photo: YandexMarket
There is another option that does not require disassembly of the case and connection to the on-board network. We are talking about films called "anti-rain". They can also work in cold weather, although not as efficiently as heated designs. The essence of their action is the repulsion of moisture. The installation method will require 5 minutes of time:
There are 2 pieces in a set. In addition to water-repellent properties, they have an anti-reflective effect and do not distort the image. Film dimensions 200x175 mm. They can also be used to protect headlights. According to the manufacturer, they do not fog up and are not covered with frost.
Transparent sticker "Anti-rain" size 200x175 mm. Average price for 2 pieces: 480 rubles. Photo: YandexMarket
Also a simple option, but worth the money. Here all the difficulties lie in connecting to the on-board network. This is the output of wires, the purchase of a button and the search for a place for it, the installation of a relay. The cheapest way involves installing a regular or universal mirror. Kits are also sold, which may include a switch, relay, wires with pads for connection.
Chinese universal product with built-in heating. Diameter for fasteners - from 17 to 19 mm. Mirror dimensions 380x200 mm. There is a standard connector for connecting the power supply.
Heated mirrors for VAZ 2110-2112 cars. This is a complete set, which includes decorative lining, fasteners in the form of self-tapping screws with washers. Inside there are detailed instructions for connecting. Technical specifications:
According to consumer reviews, the mirror really quickly thaws, including in severe frosts. The downside is the possibility of the formation of small spots.
Heated side mirror NT-10BO L+PR for VAZ 2110-12. Average price: 2300 rubles. Photo: YandexMarket
Installed on Volkswagen Jetta (2005-2011) and Golf (2003-2009). Finished product assembled. The electrical connector has 7 pins for connecting electric drive systems, heating, as well as direction indicators. It is characterized by a relatively low cost.
Finished heated side mirror with turn signal for VW. Average price: 3151 rubles. Photo: YandexMarket
It is enough to look at the prices to make it clear that it will cost almost 10 times cheaper to equip the heating on your own. The main thing is to do everything carefully and without "fanaticism", especially when it comes to heating the mirror body with a building hair dryer. Careless handling of this tool can melt the product. And the last point: when using nichrome wire, do not forget about installing a relay and a fuse. Otherwise, melting of the wiring is not ruled out, and in the worst case scenario, it will even come to a fire. And if you doubt your abilities, contact a car service or put a ready-made mirror - it will be cheaper than changing the wiring.
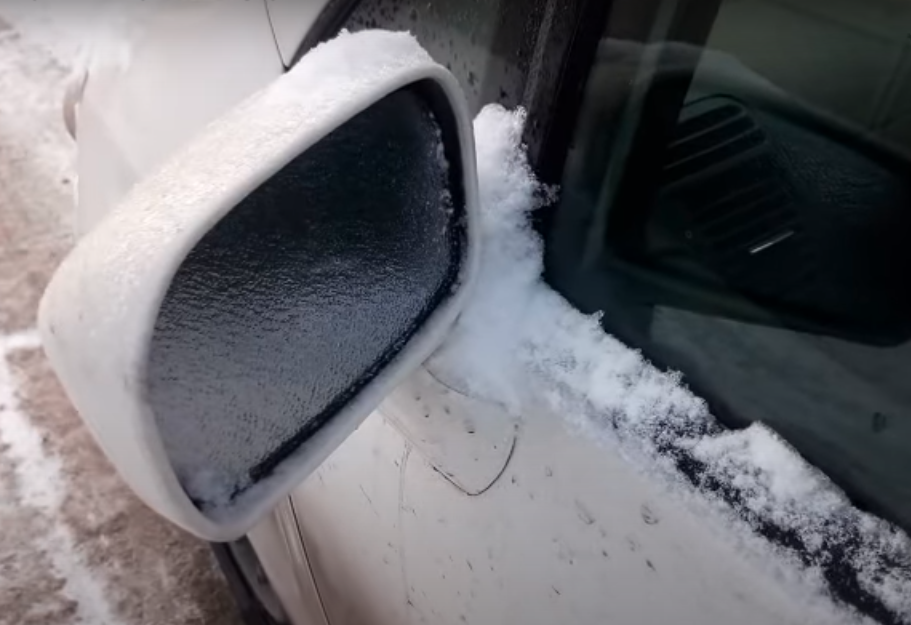
Do-it-yourself mirror heating from scratch
Once upon a time, such “convenience” was mounted using an ordinary car lamp with an incandescent filament. Of course, the method is outdated, but this does not mean that it cannot be used today. A distinctive feature of the “technology” is the minimal cost associated with the purchase of a 10 W light bulb. Well, you can also add sealant and glue for plastic here if you don’t have them. To equip the heating, you will have to remove and disassemble the mirror (separate the body from the reflective glass). There are many points here. If it is glued, you will have to use a building hair dryer. Otherwise, just unscrew the fastener. The order of further actions:
- ? cover the plastic inner surface of the case with foil
- ? find the socket for the lamp and solder wires of a suitable length to it so that it is enough to stretch through the door to the salon
- ? put the finished “construction” into the body between the stiffeners
- ? check system performance by connecting it directly to the battery
- ? carefully remove the wires after removing the door trim (you may have to drill a hole in the mirror housing with a diameter of a couple of millimeters)
The next important point is the connection. The simplest option is to use a ready-made contact for heating the rear window. However, if you are going to "improve" both mirrors, it makes sense to make a separate power button. Do not forget that the lamps consume electricity and it is not recommended to leave them on for a long time.
Heated mirrors with nichrome wire
The conductor can be pulled out of an old electric kettle or other household appliance. And nichrome thread is inexpensive in the store. You will need about a meter. More precisely, the resistance of the wire should be 12 ohms. Therefore, first cut off a 1 m piece and test it with a multimeter. If the resistance is higher, cut it off a little (1 cm). Repeat the procedure until you reach 12 ohms. First, you need to disassemble the case and pull out the reflector. Next, use a soldering iron to make tracks in the plastic, into which you first lay the foil, then the wire. Solder the cables to its ends and bring them out into the cabin.
You need to connect the “system” in the same way as described above, but it is highly not recommended to do it directly (or to the heated rear window), because the energy consumption is quite high. It is safer to use a separate fuse and relay. The latter should be four-pin. Connection:
- ? plus the on-board network (you can "take" it from the cigarette lighter) is connected through a button and a fuse to the first power contact of the relay, and "ground" - to the second
- ? connect the two wires coming from the nichrome thread to the remaining two terminals
All elements of the system can be placed behind the torpedo somewhere below (some types of relays are attached to the body with a self-tapping screw, if there is an eyelet).
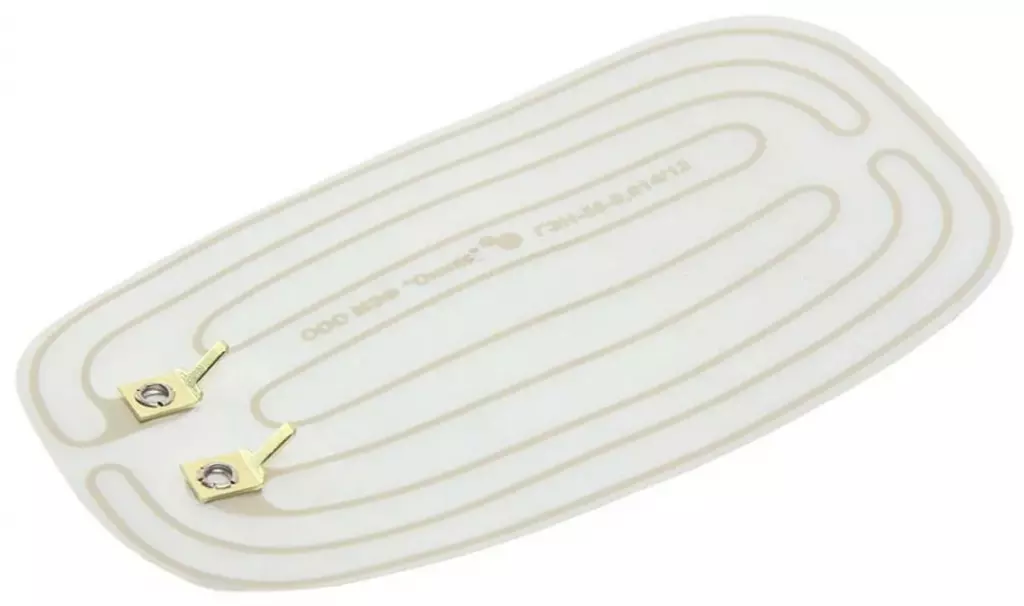
Heated mirrors through purchased printed circuit boards
A more modern and efficient way, requiring less effort and a little more money. Ready-made boards can be purchased online or at an auto shop. Structurally, the products are a pair of plates of electrically insulating material, between which there is a conductor in the form of, for example, a nichrome thread. How to install:
- ? disassemble the mirror housing
- ? line the inside with foil to reflect heat
- ? fix the board with glue or otherwise, and bring out the wires
It is best to purchase a system complete with a cable and a button.
Film heaters for mirrors
In terms of popularity, they confidently hold the first place. Installation is similar to installing boards, only nothing needs to be attached to the case. The films are glued to the back of the mirror with double tape (sometimes they already have a sticky layer on them) and connected to a power source or rear window heating.
Films from BOR
This product is from a well-known Russian manufacturer producing glass for domestic cars. The heater is inexpensive, has terminals for connecting a cable, and is installed as described above.

There is another option that does not require disassembly of the case and connection to the on-board network. We are talking about films called "anti-rain". They can also work in cold weather, although not as efficiently as heated designs. The essence of their action is the repulsion of moisture. The installation method will require 5 minutes of time:
- ? the mirror is cleaned of dirt and degreased with a solvent
- ? The film is carefully applied and smoothed to remove air bubbles.
The disadvantage is the relatively short service life. However, if the mirror is not scratched, which rarely happens in reality, the film will last a long time.
Set of stickers "Anti-rain"
There are 2 pieces in a set. In addition to water-repellent properties, they have an anti-reflective effect and do not distort the image. Film dimensions 200x175 mm. They can also be used to protect headlights. According to the manufacturer, they do not fog up and are not covered with frost.

Finished heated mirrors
Also a simple option, but worth the money. Here all the difficulties lie in connecting to the on-board network. This is the output of wires, the purchase of a button and the search for a place for it, the installation of a relay. The cheapest way involves installing a regular or universal mirror. Kits are also sold, which may include a switch, relay, wires with pads for connection.
ZL01-63-005HL
Chinese universal product with built-in heating. Diameter for fasteners - from 17 to 19 mm. Mirror dimensions 380x200 mm. There is a standard connector for connecting the power supply.
POLYTECH
Heated mirrors for VAZ 2110-2112 cars. This is a complete set, which includes decorative lining, fasteners in the form of self-tapping screws with washers. Inside there are detailed instructions for connecting. Technical specifications:
- ✅ supply voltage - from 10 to 15 V
- ✅ power - 15-18 W
- ✅ ice thawing time - no more than 3 minutes
According to consumer reviews, the mirror really quickly thaws, including in severe frosts. The downside is the possibility of the formation of small spots.

Heated mirror with turn signal for VW
Installed on Volkswagen Jetta (2005-2011) and Golf (2003-2009). Finished product assembled. The electrical connector has 7 pins for connecting electric drive systems, heating, as well as direction indicators. It is characterized by a relatively low cost.

Conclusions
It is enough to look at the prices to make it clear that it will cost almost 10 times cheaper to equip the heating on your own. The main thing is to do everything carefully and without "fanaticism", especially when it comes to heating the mirror body with a building hair dryer. Careless handling of this tool can melt the product. And the last point: when using nichrome wire, do not forget about installing a relay and a fuse. Otherwise, melting of the wiring is not ruled out, and in the worst case scenario, it will even come to a fire. And if you doubt your abilities, contact a car service or put a ready-made mirror - it will be cheaper than changing the wiring.
- Sergey M.
- https://youtube.com
We recommend for you

Restrictions lifted – PD-14 received a new certificate
The engine is one step closer to serial production. The power plant has been given an important approval....

"We won't give up so easily" - Shacman responded to the ban on the sale of dump trucks in Russia
The situation with the recall of sales and OTTS continues to gain momentum. The representative office of Chinese brands has prepared a plan and specific countermeasures. All...

"We've Changed Our Minds" - Hyundai Wants to Return to Russia and Buy Back Its Plant
This desire was caused by an event not directly related to the automobile industry. Read all the details and possible further developments in our material....

In Russia, the production of aluminum bodies has been completely localized
The precedent was the first in the history of the enterprise. The first workshop is already producing products, the second stage of the modern robotic plant has been launched....

The Russian SJ-100 airliner is almost ready – all that remains is to combine the two planes
Two airliners are currently undergoing testing. If they were assembled into one, they would result in a 100% import-substituting SJ-100....

Ladoga gets “wings” – Smolensk plant joins the work
Cooperation in TVRS-44 production continues to expand. Involvement of more domestic plants will speed up serial production of the aircraft....

Traffic police will be able to check drivers' smartphones and issue fines from quadcopters
In 2025, the rules of the game on the roads are changing, and not in favor of drivers. The State Traffic Safety Inspectorate is actively expanding its control tools: now you can be monitored not only by...

UTS-800 to be shown abroad for the first time
UTS-800 is a training model. But it can be modified at the customer's request for other purposes....

Why the 38th upper side is the best seat in a compartment carriage
It's a nightmare and a quiet horror to travel on the last, upper side seat, isn't it? Times are changing, gentlemen. Find out about the advantages of the 38th seat in a reserved seat carriage from our...

Seaplanes are back in favor – new Polaris unveiled
And already, long before serial production, the first potential buyer places a large order. Read more about the new old project in our material....

The ZIF-77 moped is not a bicycle with a motor
The simplest means of transport in the USSR, even in the early days, were bicycles. But pedaling constantly is difficult, and the speed of movement...

“We pushed as a team” – how the “Sobol NN 4x4” passed the off-road test
Last fall, sales of the new all-wheel drive Sobol started. The car has changed significantly - there are noticeable differences in the design and equipment....

Russia has a new training aircraft – its domestic engine is almost ready
Recently, the S7 Group company presented its "brainchild" - the TANGO training aircraft. I want to add "over the abyss", but the technology is interesting. Pro...

Production of new Russian sedans has started – Amberauto A5
There are no prices yet, but this electric car was created to order and with the help of Renault. They promise a three-year warranty and a decent power reserve....

Ground testing of PD-8 engines has begun in Komsomolsk-on-Amur
Certification of the smaller version of the PD-14 is close. Flight tests should be conducted this year....

8 unusual versions of the Volga that could have changed the Soviet auto industry
GAZ-24 "Volga" is one of the most iconic cars in the history of the USSR, a symbol of prestige and reliability. However, few people know that over the long years of existence of this...