Causes of cloudy optics
It’s worth mentioning right away: if it turned yellow from old age, no recovery methods will help - you will have to buy a new one. Once upon a time, glass was used to make optics. However, it turned out to be expensive, and the material is fragile. More and more manufacturers prefer plastic, from which it is easier to bend a headlight of any shape, and it costs less. However, such a material has a significant disadvantage - it quickly becomes covered with micro-scratches and becomes opaque due to constant contact with sand, road dirt. Especially quickly the problem appears when constantly driving on bad roads. There are other reasons why headlights become cloudy:
✅ constant exposure to ultraviolet light;
✅ wiping glass with hard rags, brushes
Buying a new headlight is sometimes prohibitively expensive, even a used one. It is one thing - cars of Russian brands and another - cars made abroad or from imported components. It is even more difficult to find optics for rare or rare pieces of equipment. As practice shows, the optimal period for grinding headlights is once every three years. At the factory, a special protective layer is applied to the glass, which can withstand three or four polishing procedures.
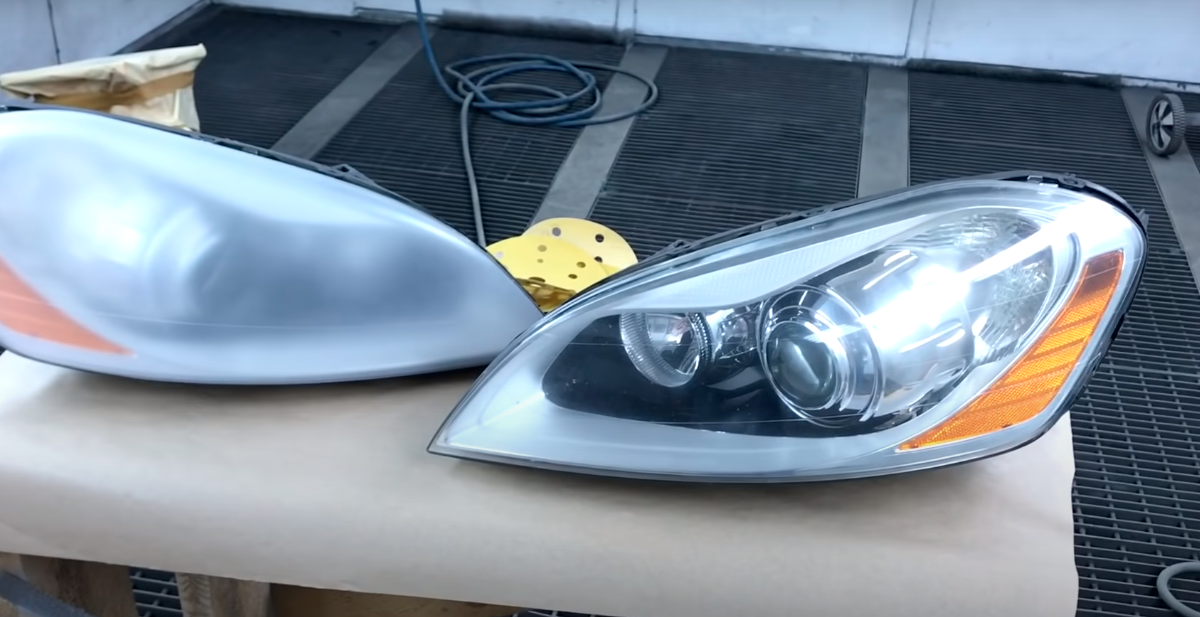
 Time and sand, dirt did their job - the headlight became cloudy. Photo: YouTube.com
You can, of course, give the car to the service - the operation is relatively simple and does not take much time. The cost of the service starts from 1500 rubles, depending on the brand of car and the condition of the diffuser. However, if there is a drill (grinder), a circle-nozzle with Velcro, you can do everything yourself. You only need to buy the appropriate polishes and sandpaper of the desired grit. There are several ways to restore the transparency of optics.
Preparing headlights for polishing
Clean the glass of the lanterns from dirt with any household detergent, wipe dry with a clean cloth. If possible, it is better to remove the headlight so that when grinding it does not damage the body polish.
 The preparatory stage is pasting the body parts around the headlight with adhesive tape. Photo: YouTube.com
Otherwise, cover with masking tape all adjacent areas of the paintwork. In addition to a drill and a nozzle, you will also need:
✅ sandpaper with a grit of 4, 3, 2 and 1 thousand, fixed on a wheel with Velcro and designed for wet processing
✅ a pair of foam rubber circles - one for abrasive, the second for finishing polishing
✅ spray bottle on a XNUMX liter water bottle
✅ a few clean rags
If you are polishing headlights for the first time, it is advisable to carry out the procedure with one of them from start to finish.
Processing glass optics with sandpaper
First, rough grinding is performed. To do this, fix the "thousandth" - the largest sandpaper itself - on a circle with Velcro. Set the drill to medium speed, grind the headlight, gradually moving from one place to another and not lingering in one area so as not to overheat (check with your hand) the plastic. During the procedure, moisten the glass with water from the "sprinkler". The initial stage lasts about a minute. At the end of it, run your hand over the headlight - it should not feel uneven. Then rinse with water and wipe the glass - after drying it should become matte.
 Heavily scratched headlights can be started with 500 grit sandpaper. Photo: YouTube.com
The operation is repeated, but only with the successive replacement of the emery cloth with a finer one - with a grain size of 2 thousand, 3 and 4 thousand. The glass will brighten before our eyes.
Polishing with pastes
After the "four thousandth" circle, attach foam rubber to the nozzle for abrasive processing. Apply the appropriate polish to the glass in dots with a diameter of approximately 10 mm (5-10 pieces, depending on the headlight area).
 Polishing paste complete with sanding paper. Average price: 344 rubles. Photo: YouTube.com
Processing is carried out at low speeds. If the paste dries out, sprinkle it with water. After a minute or two of work, rinse the glass and wipe dry with a clean cloth.
 Polishing grinder with foam nozzle. Photo: YouTube.com
For finishing polishing, use the appropriate paste and foam rubber, which are called so. Repeat the operation in the same way as in the previous case, but without water.
Varnish coating
This procedure will help protect the glass base from minor damage. The best effect is the use of two-component formulations. Work should be carried out in a room where there is no dust, if everything is done on the street, then it is better in calm weather. Action algorithm:
✅ mix the components in a separate container (for example, a disposable glass) in a small amount (the solution is good for 5 minutes)
✅ moisten a lint-free cloth with the product and apply varnish to the headlight from its upper corner, gradually moving down so that the stripes overlap each other
✅ wait about an hour and repeat the procedure
When using aerosol for varnishing, keep the jet at a distance of 20-25 cm from the surface. The coating layer should be thin and uniform. Repeat the procedure several times.
 Acrylic lacquer for headlight tinting KERRY 210 ml. Average price: 539 rubles. Photo: YandexMarket
After completion of work, it is advisable not to use the car during the day. If you want to speed up the polymerization, use a building hair dryer or turn on the low beam.
Chemical way to restore the transparency of headlights
The meaning of the operation is that under the influence of a chemical substance in a vapor state, plastic glass is restored: microcracks are filled with a transparent composition. In online stores, sometimes there are special kits for "repair" of optics.
 Chemical restoration of headlights. Photo: YouTube.com
Usually the kit includes a bottle with a chemical reagent, a mug with a spout and a heater from household 220 volts, a funnel. Respirator, sometimes sandpaper. Progress:
✅ clean and dry the headlight, fill the mug with 100 ml of chemical reagent and turn on the heater until steam appears from the spout
✅ bring the container to the bottom of the glass at a distance of 10 mm and gradually move up
The coating dries in 10 minutes, but full hardness is gained in 3-4 hours (see instructions). One container that comes with the kit is enough for 20-25 headlights, so it makes sense to buy a set in half with a friend who owns a car.
Film booking
The procedure is usually performed after polishing the headlights. You can buy a ready-made kit. It includes a bottle with a chemical composition (spray), a squeegee (you can use a bank card system) for smoothing, clean napkins, and sometimes a sharp knife.
 Booking headlights. Photo: YouTube.com
The film can be presented as a single piece or separate fragments for cases of installation on optics with a complex configuration. Course of action:
✅ moisten your hands with water so that they are wet during operation and do not leave marks on the sticky part of the film
✅ remove the backing and spray a chemical or soapy solution on the headlight and film
✅ attach it to the bottom corner of the diffuser, fix it (press hard) and stretch it over the entire area
✅ smooth the surface with a squeegee (to make it slide better, treat the outside of the film with a tool) from the center to the edges
✅ if wrinkles have formed, heat them with a building (regular) hair dryer and smooth again
At the final stage, cut off the excess material with a sharp knife. After finishing work, a small amount of liquid may remain under the film, due to which the headlight will appear cloudy. But after a couple of days, the moisture will evaporate and transparency will be restored. After the procedure is over, do not leave the car in the rain and do not wash it for a couple of days so that the chemical composition of the adhesive layer of the film is well activated.